Document Tutorial : Creating Boxouts
Boxouts are used by graphic designers as a means of breaking up large areas of text, and pulling out key phrases that should stand out from the body of the text. You can use this technique to make your document more interesting to read, while at the same time, adding a bit of style.
What is a boxout?
This is! A box that sits alongside the main body of text.
|
[*Boxout inserted here] I've added the boxout to the right of this paragraph to feature a related comment that doesn't really fit in the main body of the text. Other common uses are to feature a quote, a definition, related information or bullet points, or contact information.
Creating this effect relies on aligning tables - follow the steps below to see how this is done. Click on the screenshots in order to enlarge them, the screenshots are taken from Firefox on a Mac, but it will work the same on any browser.
|
Create the table
|
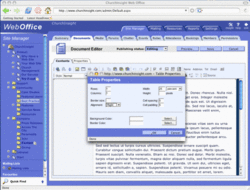
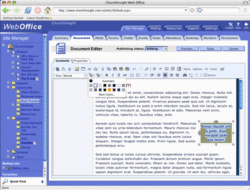
First, position the cursor at the start of the paragraph that you want your boxout to be alongside. In the example above the table is actually inserted where the [*] highlighted text is. Then click on Insert Table to bring up the dialog as per the diagram.
Create a table with the following settings:
- Rows:1, Columns:1 - a table that contains only one cell
- Width: 25 percent - you may want to adjust this to suit your text, but it should probably be less than 50% wide so as not to distract from your main paragraph text.
- Alignment: Right - this is the important one. Alignment does not refer to the text inside the box, it refers to the position of the table relative to the surrounding content. In this case we want the table to sit to the right of the surrounding paragraph.
- Cell Spacing: 5, Cell Padding 5 - this defines the spacing around the background colour - more about this later.
Remember you can always change these properties later by right clicking in the table, and selecting Table Properties.
|
|
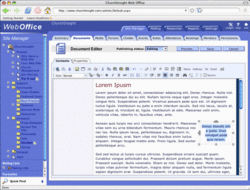
Insert Text
|
Press Ok, and you will see a box inserted to the right of your text. You can now type or paste the contents of your boxout (text or images) into this box and it will sit alongside your main body content. In this example I've centered the text using the toolbar. |
|
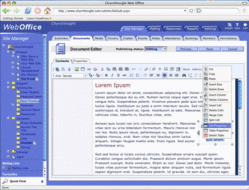
Edit Table Cell
|
The next stage is to set the colour of the boxout, this is done by applying a background colour to the table cell. To do this, right click in the table cell, and select Cell Properties from the menu. |
|
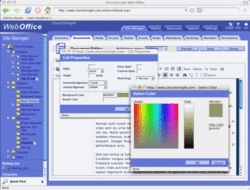
Set Background
|
Press Select... next to the background color box to open a colour selector. Here I have chosen a dark colour to provide a contrast against the white text. Press Ok to close the colour selector, and Ok again to close the Cell Properties window. |
|
Set Foreground
|
To contrast against the dark background, I now select all the text, and choose a bright colour for the foreground. This technique of swapping the background and foreground colours (negative colouring) brings interest without disrupting the main colour scheme. |
|
The Result!
|
Press Preview to examine the result - this gets rid of the guidelines around the table so you can see the effect more clearly. You can now experiment with different locations for your box (click and drag the box to a new postion, remembering to put it before the text you want it beside); you can adjust the width or height; or try different colours and spacing until you get the result you want. |
A word about Spacing
Some of you may be wondering why I've suggested to put the background colour on the cell, rather than the table as a whole. The reason is to do with controlling the spacing around the table and the text.
The body text will run right up to the boxout table, this is especially noticable if you have a right-aligned paragraph, or the boxout on the left. The Cell Spacing setting on the table allows you to control the amount of space (in pixels) between the table and the cell. As our cell has a different background colour, the cell spacing actually controls the margin between the paragraph and the box out.
This magnified screenshot has been annotated to show how cell spacing and cell padding control the relationship between the table cell and its containing table:
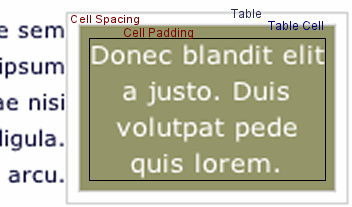
The Cell Padding setting controls the amount of space within the cell before the text starts. In the magnified example above, I've drawn in an additional box that highlights the cell padding within the cell. So for our boxout, we can use the Cell Padding setting on the table to control the amount of space between the text and the coloured background.
Some examples:
| This boxout has a background colour applied to the table, not the cell |
Cell spacing 0, Cell padding 0:
This is what happens if the table has a background colour - the body text may be too close for comfort!
| The green background of the table, is overlaid by the cell background. |
Cell spacing 4, Cell padding 1: You could also set two different background colours on the table and on the cell, so as to create a wide border. The width of the border is the cell spacing.
| This table is the same width as the tables above. |
Cell spacing 10, Cell padding 10: A large cell padding gives plenty of space around the text in the box, whilst the large cell spacing keeps the box further away from this body text.
|